概要
- Raspberry Piでシフトレジスターを介して4桁7セグメントLEDをコントロール
- 各桁を短時間で明滅させて、視覚的に全桁が同時発光しているように見せる
- おまけでカウントダウンタイマーにしてみた
4桁7セグメントLEDのピン配置と回路
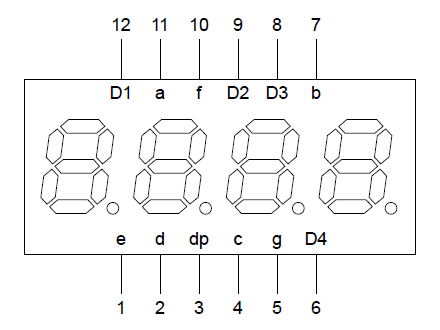
キットに同梱されていたLEDのピン配置は下図の通り。

D1~D4のピンは左から順に各桁の7セグメントLEDに対応している。これらのピンがHIGHのLEDにa~dpのピンへの入力が反映されて表示される。LOWの時にはLEDは消灯する。
a~dpは7セグメントLEDのピン配置に対応している。
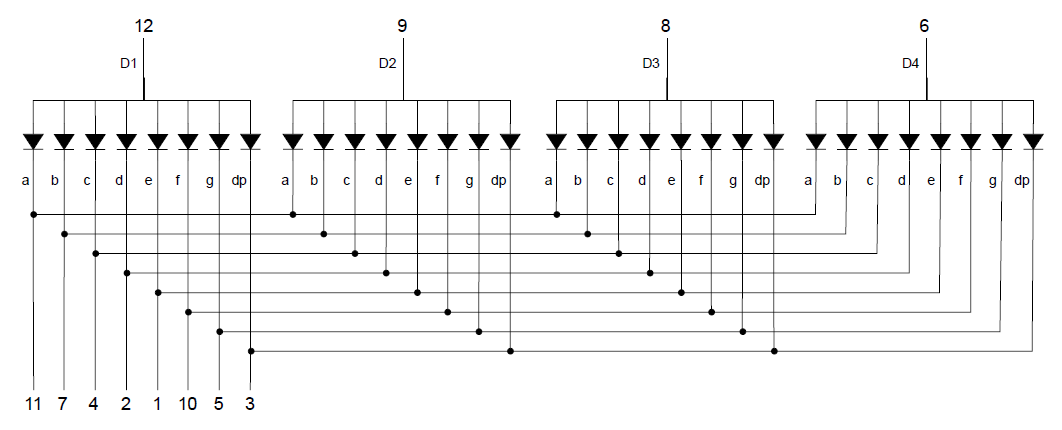
内部の回路は以下の通りで、カソードコモンとなっている。たとえば左から2桁目のLEDを点灯させたいときは、D2をHIGHにしてa~dpのうち点灯させたいセグメントのピンをLOWに、消灯させたいセグメントのピンをHIGHにする。

4桁の同時発光
セグメントの明滅を制御するa~dpのピンが1組しかないので、ある桁を特定のパターンで点灯させたいときは、他の桁は消灯させる(でなければ、DnがHIGHになっている桁の全てが同じパターンで点灯する)。
そこで、ある桁を短い時間点灯させたあと消灯するという動作を各桁入れ替えながら実行していく。点灯・入れ替えの時間が十分短いと、残像減少によって人の目には全桁が同時発光しているように見える。
Raspberry Piによる制御回路
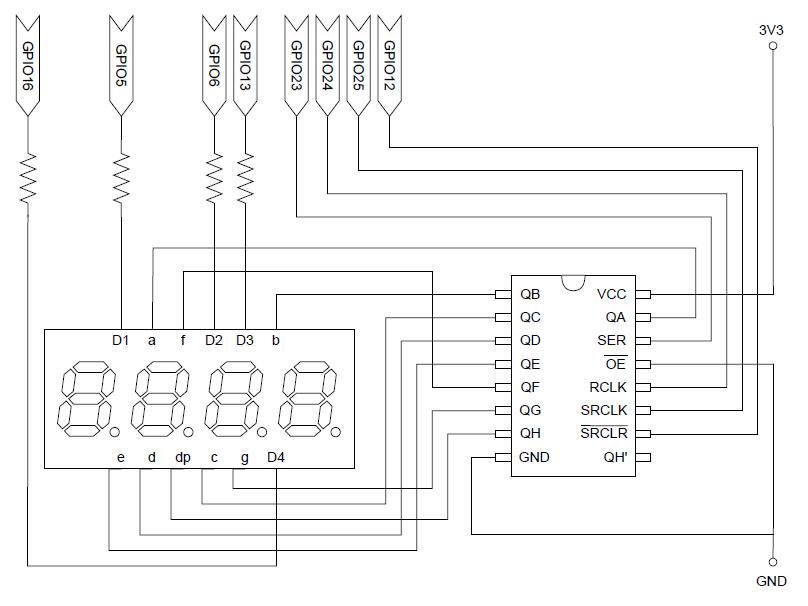
全体の考え方は以下の通り。
- D1~D4の桁選択ピンは4つのGPIOピンでコントロールする
- a~dpのセグメント選択ピンはシフトレジスター74HC595を介してコントロールする
- 7セグメントLEDの保護抵抗はD1~D4に1つずつ繋ぎ、1つの7セグメントあたり1つとする

試験点灯
ソフトウェアによる制御の考え方は以下の通り。
- 初期設定ではD1~D4をLOWにする
- DnをD1~D4と順番に入れ替えて以下を繰り返す
- DnをHIGHにして選択する
- 選択したLEDに対してシフトレジスターを介して表示パターンを送る
- 表示パターンはa→dpの順の8ビットで定義して、LSBから順にシフトレジスターに送り込む
- 一定時間sleepさせる
- HIGHにしたDnをLOWにする
- CTRL-Cが押されたらD1~D4をLOWにして終了処理を行う。
以下のPythonコードでは、いくつかの関数を定義している。
initialize- LEDとシフトレジスターの初期化を行う。
destroy- 終了処理を行う。
display_a_digit- 指定した桁のLEDを指定したパターンで一定時間点灯させる。桁の指定は左から0~3、パターンは0~9の数字に対応したビットパターン、点灯時間はミリ秒で与える。
display_digits- 表示させる4桁の数値を文字列で与えて、一定時間点灯させる。ミリ秒で与えた点灯時間は
display_a_digit関数にそのまま渡される。
|
1 2 3 4 5 6 7 8 9 10 11 12 13 14 15 16 17 18 19 20 21 22 23 24 25 26 27 28 29 30 31 32 33 34 35 36 37 38 39 40 41 42 43 44 45 46 47 48 49 50 51 52 53 54 55 56 57 58 59 60 61 62 63 64 65 66 67 68 69 |
import RPi.GPIO as GPIO import time # Define GPIO pin numbers SER = 23 SRCLK = 25 RCLK = 24 SRCLR = 12 DIGIT_PINS = [5, 6, 13,16] # Define bit patterns for numbers 0 to 9 PATTERNS = [0xfc, 0x60, 0xda, 0xf2, 0x66, 0xb6, 0xbe, 0xe0, 0xfe, 0xf6] # Define initializing function def initialize(): GPIO.setmode(GPIO.BCM) # Deselect all the digits for digit in DIGIT_PINS: GPIO.setup(digit, GPIO.OUT, initial=GPIO.LOW) # LEDs are anode common GPIO.setup(SER, GPIO.OUT, initial=GPIO.HIGH) GPIO.setup(SRCLK, GPIO.OUT, initial=GPIO.LOW) GPIO.setup(RCLK, GPIO.OUT, initial=GPIO.LOW) # SRCLR is negative logic GPIO.setup(SRCLR, GPIO.OUT, initial=GPIO.HIGH) # Define ending process function def destroy(): for digit in DIGIT_PINS: GPIO.output(digit, GPIO.LOW) GPIO.cleanup() # Define function to display single digit # digit: suffixes of DIGITS list # pattern_number: suffixes of PATTERNS list # duration: Duration time to turn on the designated digit (milliseconds) def display_a_digit(digit, pattern_number, duration): GPIO.output(DIGIT_PINS[digit], GPIO.HIGH) # Do for each number display for n in range(8): # Input bits from LSB to MSB # True == 1 == GPIO.HIGH and False == 0 == GPIO.LOW GPIO.output(SER, not((PATTERNS[pattern_number] >> n) & 1)) # Send bit to shift register GPIO.output(SRCLK, GPIO.HIGH) GPIO.output(SRCLK, GPIO.LOW) # Get parallel data GPIO.output(RCLK, GPIO.HIGH) GPIO.output(RCLK, GPIO.LOW) # Continue to turn on during duration time time.sleep(duration) # Turn off the digit afterwards GPIO.output(DIGIT_PINS[digit], GPIO.LOW) # Display all the digits # value_string: 4-digit integer value in string to display # duration: duration time to display each digit def display_digits(value_string, duration): for digit, number in enumerate(list(value_string)): display_a_digit(digit, int(number), duration) # Start Execution initialize() try: while True: display_digits('1234', 0.001) except KeyboardInterrupt: destroy() |
カウントダウンタイマー
time.perf_counter
4桁7セグメントLEDでカウントダウンタイマーを作ってみた。
- 左2桁が分、右2桁が秒に対応する
- 動作中は秒数でコントロールし、LED表示のために分と秒を分解する
- 点灯時間を
time.perf_count関数で計り、約1秒ごとにカウントダウンする - カウントダウンを終えたら’0000’を表示して割り込みを待つ
なお、整数値の分・秒を2桁表示の文字列にする関数get_two_digits関数を定義している。
|
1 2 3 4 5 6 7 8 9 10 11 12 13 14 15 16 17 18 19 20 21 22 23 24 25 26 27 28 29 30 31 32 33 34 35 36 37 38 39 40 41 42 43 44 45 46 47 48 49 50 51 52 53 54 55 56 57 58 59 60 61 62 63 64 65 66 67 68 69 70 71 72 73 74 75 76 77 78 79 80 81 82 83 84 85 86 87 88 89 90 91 92 93 94 95 96 97 98 99 100 |
import RPi.GPIO as GPIO import time # Define GPIO pin numbers SER = 23 SRCLK = 25 RCLK = 24 SRCLR = 12 DIGIT_PINS = [5, 6, 13,16] # Define bit patterns for numbers 0 to 9 PATTERNS = [0xfc, 0x60, 0xda, 0xf2, 0x66, 0xb6, 0xbe, 0xe0, 0xfe, 0xf6] # Define initializing function def initialize(): GPIO.setmode(GPIO.BCM) # Deselect all the digits for digit in DIGIT_PINS: GPIO.setup(digit, GPIO.OUT, initial=GPIO.LOW) # LEDs are anode common GPIO.setup(SER, GPIO.OUT, initial=GPIO.HIGH) GPIO.setup(SRCLK, GPIO.OUT, initial=GPIO.LOW) GPIO.setup(RCLK, GPIO.OUT, initial=GPIO.LOW) # SRCLR is negative logic GPIO.setup(SRCLR, GPIO.OUT, initial=GPIO.HIGH) # Define ending process function def destroy(): for digit in DIGIT_PINS: GPIO.output(digit, GPIO.LOW) GPIO.cleanup() # Define function to display single digit # digit: suffixes of DIGITS list # pattern_number: suffixes of PATTERNS list # duration: Duration time to turn on the designated digit (milliseconds) def display_a_digit(digit, pattern_number, duration): GPIO.output(DIGIT_PINS[digit], GPIO.HIGH) # Do for each number display for n in range(8): # Input bits from LSB to MSB # True == 1 == GPIO.HIGH and False == 0 == GPIO.LOW GPIO.output(SER, not((PATTERNS[pattern_number] >> n) & 1)) # Send bit to shift register GPIO.output(SRCLK, GPIO.HIGH) GPIO.output(SRCLK, GPIO.LOW) # Get parallel data GPIO.output(RCLK, GPIO.HIGH) GPIO.output(RCLK, GPIO.LOW) # Continue to turn on during duration time time.sleep(duration) # Turn off the digit afterwards GPIO.output(DIGIT_PINS[digit], GPIO.LOW) # Display all the digits # value_string: 4-digit integer value in string to display # duration: duration time to display each digit def display_digits(value_string, duration): for digit, number in enumerate(list(value_string)): display_a_digit(digit, int(number), duration) # Define function to convert integer to 2-digit string with 0 prefixed def get_two_digits(n): return ('00' + str(n))[-2:] # Start Execution initialize() # time is counted in seconds minutes = 0 seconds = 10 time_in_seconds = minutes * 60 + seconds try: # Loop while countdown continues while True: start = time.perf_counter() end = start # Display all the digits for 1 second while True: m = time_in_seconds // 60 s = time_in_seconds - m * 60 # Countdown ends when time reached 0 second if (m == 0 and s == 0): break # Display LED display_value = get_two_digits(m) + get_two_digits(s) display_digits(display_value, 0.001) end = time.perf_counter() # Countdown after 1 second if end - start >= 1.0: time_in_seconds -= 1 break # Continue to display 0000 after countdown ends if time_in_seconds == 0: while True: display_digits('0000', 0.001) except KeyboardInterrupt: destroy() |
69-72行で分と秒をセットし、それを総秒数に計算。
77-93行がカウントダウン部分。
- tartとendをtime.perf_counterで取得して経過秒数を計算
- 表示秒数が1秒たつとカウントダウン
- カウントダウン後と残りゼロ秒になったときに内側のループを抜ける
95-98行目では、残りゼロ秒になったときにオールゼロを表示して待機。
スレッド
実行部分をシンプルにするためにスレッドを使ってみた。
|
1 2 3 4 5 6 7 8 9 10 11 12 13 14 15 16 17 18 19 20 21 22 23 24 25 26 27 28 29 30 31 32 33 34 35 36 37 38 39 40 41 42 43 44 45 46 47 48 49 50 51 52 53 54 55 56 57 58 59 60 61 62 63 64 65 66 67 68 69 70 71 72 73 74 75 76 77 78 79 80 81 82 83 84 85 86 87 88 89 90 91 92 93 94 95 96 97 98 99 100 101 102 103 104 105 106 107 108 109 110 111 112 113 |
import RPi.GPIO as GPIO import time import threading # Define GPIO pin numbers SER = 23 SRCLK = 25 RCLK = 24 SRCLR = 12 DIGIT_PINS = [5, 6, 13,16] # Define bit patterns for numbers 0 to 9 PATTERNS = [0xfc, 0x60, 0xda, 0xf2, 0x66, 0xb6, 0xbe, 0xe0, 0xfe, 0xf6] # Define initializing function def initialize(): GPIO.setmode(GPIO.BCM) # Deselect all the digits for digit in DIGIT_PINS: GPIO.setup(digit, GPIO.OUT, initial=GPIO.LOW) # LEDs are anode common GPIO.setup(SER, GPIO.OUT, initial=GPIO.HIGH) GPIO.setup(SRCLK, GPIO.OUT, initial=GPIO.LOW) GPIO.setup(RCLK, GPIO.OUT, initial=GPIO.LOW) # SRCLR is negative logic GPIO.setup(SRCLR, GPIO.OUT, initial=GPIO.HIGH) # Define ending process function def destroy(): for digit in DIGIT_PINS: GPIO.output(digit, GPIO.LOW) GPIO.cleanup() # Define function to display single digit # digit: suffixes of DIGITS list # pattern_number: suffixes of PATTERNS list # duration: Duration time to turn on the designated digit (milliseconds) def display_a_digit(digit, pattern_number, duration): GPIO.output(DIGIT_PINS[digit], GPIO.HIGH) # Do for each number display for n in range(8): # Input bits from LSB to MSB # True == 1 == GPIO.HIGH and False == 0 == GPIO.LOW GPIO.output(SER, not((PATTERNS[pattern_number] >> n) & 1)) # Send bit to shift register GPIO.output(SRCLK, GPIO.HIGH) GPIO.output(SRCLK, GPIO.LOW) # Get parallel data GPIO.output(RCLK, GPIO.HIGH) GPIO.output(RCLK, GPIO.LOW) # Continue to turn on during duration time time.sleep(duration) # Turn off the digit afterwards GPIO.output(DIGIT_PINS[digit], GPIO.LOW) # Display all the digits # value_string: 4-digit integer value in string to display # duration: duration time to display each digit def display_digits(value_string, duration): for digit, number in enumerate(list(value_string)): display_a_digit(digit, int(number), duration) # Define function to convert integer to 2-digit string with 0 prefixed def get_two_digits(n): return ('00' + str(n))[-2:] # Define custom class inheriting Thread to display number class NumberDisplay(threading.Thread): # Arguments are same to those of display_digits function def __init__(self, value_string, duration): threading.Thread.__init__(self) self.value_string = value_string self.duration = duration self.is_running = True # Override run method of Thread class def run(self): # Continue while the flag is True while self.is_running: display_digits(self.value_string, self.duration) # Quit running by setting the flag to False def stop(self): self.is_running = False # Start Execution initialize() # time is counted in seconds minutes = 0 seconds = 5 time_in_seconds = minutes * 60 + seconds try: # Loop while time remains while time_in_seconds > 0: # Set value_string from minuts and seconds m = time_in_seconds // 60 s = time_in_seconds - m * 60 value_string = get_two_digits(m) + get_two_digits(s) # Create thread to display the number t = NumberDisplay(value_string, 0.001) # Continue to display for 1 second t.start() time.sleep(1.0) t.stop() # Count down time_in_seconds -= 1 while True: display_digits('0000', 0.001) except KeyboardInterrupt: destroy() |
66-83行目で、4桁の内容を表示し続けるスレッドクラスを準備。
95-108行目で、1秒ごとにスレッドを発生させて現在の残り時間を表示。
回路の写真
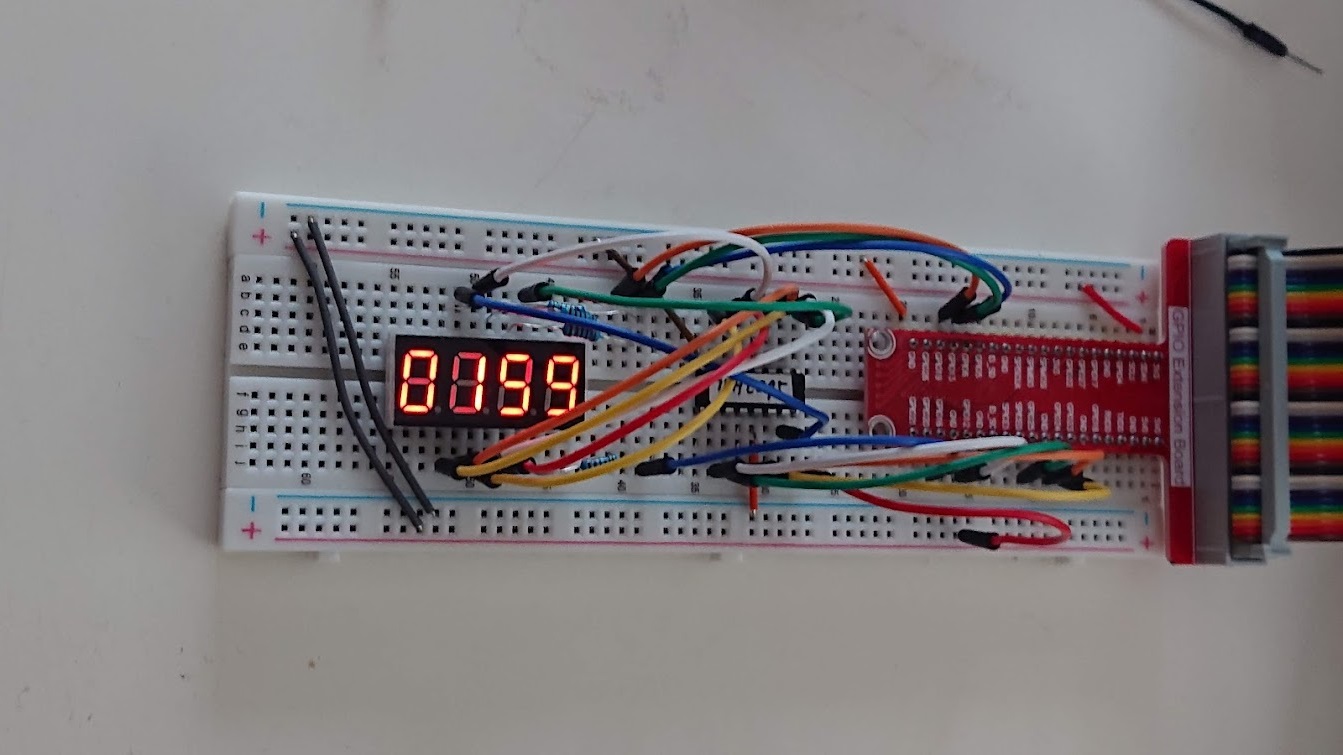
74HC595の向きを逆にしてしまったのでコードがごちゃごちゃ。
