概要
“Pythonではじめる機械学習”のランダムフォレストの写経。
ランダムフォレストは決定木のアンサンブル法の1つ。異なる複数の決定木をランダムに発生させて平均をとることで、個々の決定木の過剰適合を打ち消すという考え方。
実行例
以下は、scikit-learnのランダムフォレストのモデルRandomForestClassifierでmoonsデータセットをクラス分類した例で、ランダムに生成された5つの木とそれらを平均したランダムフォレストの決定領域を示している。
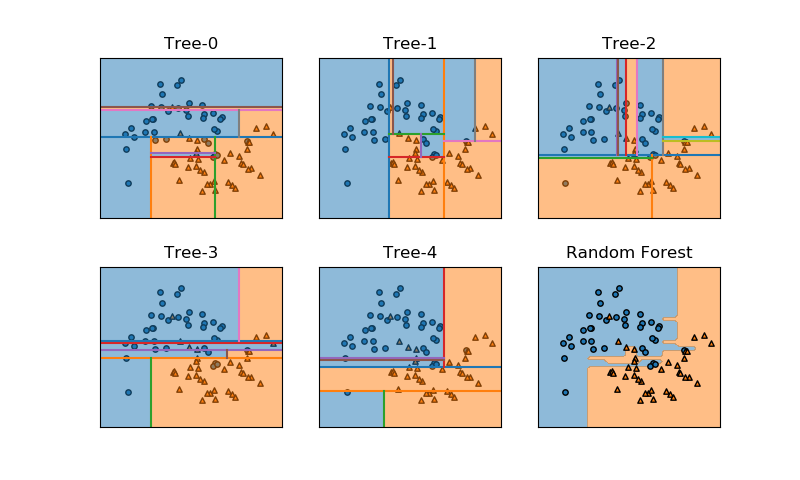
以下は実装コードで、draw_decision_field()とdraw_tree_boundary()はコードを省略。
|
1 2 3 4 5 6 7 8 9 10 11 12 13 14 15 16 17 18 19 20 21 22 23 24 25 26 27 28 29 30 31 32 33 34 35 36 37 38 39 40 41 42 43 44 45 46 47 48 49 50 51 |
import numpy as np import matplotlib.pyplot as plt import matplotlib.patches as patch from sklearn.datasets import make_moons from sklearn.model_selection import train_test_split from sklearn.ensemble import RandomForestClassifier def draw_decision_field(clf, ax, x0s, x1s, n_areas=2, colors=['tab:blue', 'tab:orange'], alpha=0.5, fill=True): # コード省略 def draw_tree_boundary(tree, ax, left, right, bottom, top, i_node=0, stop_level=None, n_level=0): # コード省略 X, y = make_moons(n_samples=100, noise=0.25, random_state=3) X_train, X_test, y_train, y_test =\ train_test_split(X, y, stratify=y, random_state=42) x0_min, x0_max = -1.8, 2.5 x1_min, x1_max = -1.0, 1.8 x0s = np.linspace(x0_min, x0_max, 50) x1s = np.linspace(x1_min, x1_max, 50) forest = RandomForestClassifier(n_estimators=5, random_state=2) forest.fit(X_train, y_train) fig, axs = plt.subplots(2, 3, figsize=(8, 4.8)) fig.subplots_adjust(hspace=0.3) axs_1d = axs.reshape(-1) for i, ax in enumerate(axs_1d[:-1]): draw_tree_boundary(tree=forest.estimators_[i].tree_, ax=ax, left=x0_min, right=x0_max, bottom=x1_min, top=x1_max) ax.set_title("Tree-{}".format(i)) draw_decision_field(forest, axs_1d[-1], x0s, x1s) axs_1d[-1].set_title("Random Forest") for ax in axs_1d: ax.scatter(X_train[y_train==0][:, 0], X_train[y_train==0][:, 1], marker='o', s=15, fc='tab:blue', ec='k') ax.scatter(X_train[y_train==1][:, 0], X_train[y_train==1][:, 1], marker='^', s=15, fc='tab:orange', ec='k') ax.set_xlim(x0_min, x0_max) ax.set_ylim(x1_min, x1_max) ax.tick_params(bottom=False, left=False, labelbottom=False, labelleft=False) plt.show() |
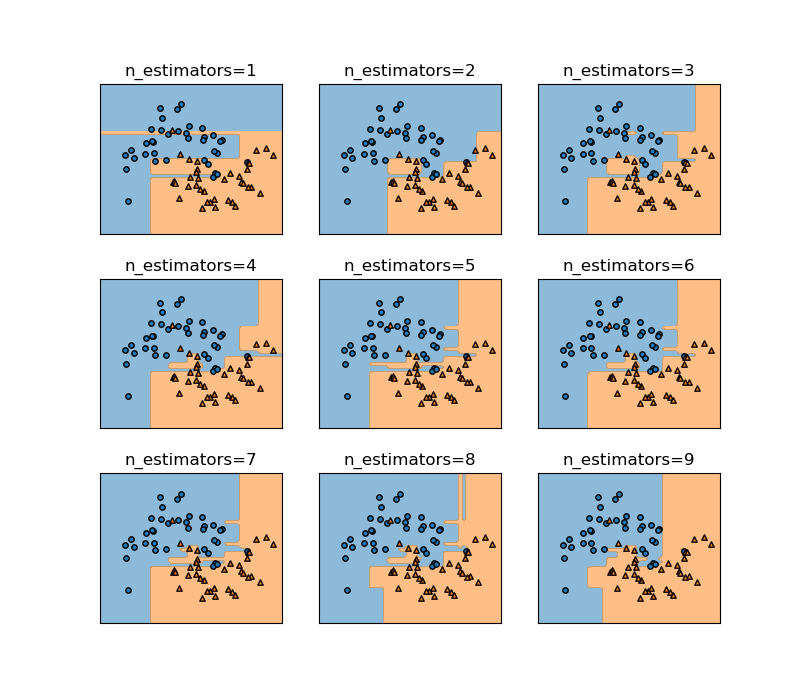
上の例でn_estimatorsの数を1から9まで増やしていったときの様子を示す。徐々に細かい枝が取り払われて、境界が滑らかになっていく様子がわかる。
ランダムフォレストの考え方
概要
ランダムフォレストの大まかな手順は以下の通り。
- 訓練/ランダムフォレストの構築
- 決定木の数を指定する
- 決定木の数の分だけ、訓練データからランダムにデータを生成する
- 各決定木を学習させる
- 予測段階
- 予測したいデータの特徴量を与える
- その特徴量に対して各決定木がクラス分類
- 各決定木の分類結果の多数決でクラスを決定
ランダムフォレストの構築
決定木の数
決定木の数をRandomForestClassifierのn_estimatorsパラメーターで、構築する決定木の数を指定する。
決定木に与えるデータの生成
各決定木に与えるデータセットをランダムに設定。特徴量の一部または全部を選び、各特徴量のデータをブートストラップサンプリングによってランダムに選び出す。
RandomForestClassifierでは、選ぶ特徴量の数をmax_featuresで指定し、各特徴量のデータをブートストラップサンプリングで選ぶかどうかをbootstrap(=True/False)で設定する。これらの乱数系列をrandom_stateパラメーターで指定する。
冒頭の事例の場合、特徴量は2つなので常にいずれも選び、bootstrapはデフォルトのTrue、決定木の数を3つ、乱数系列を3と指定している。
|
1 2 |
forest = RandomForestClassifier(n_estimators=3, random_state=2) forest.fit(X_train, y_train) |
ランダムフォレストによる予測
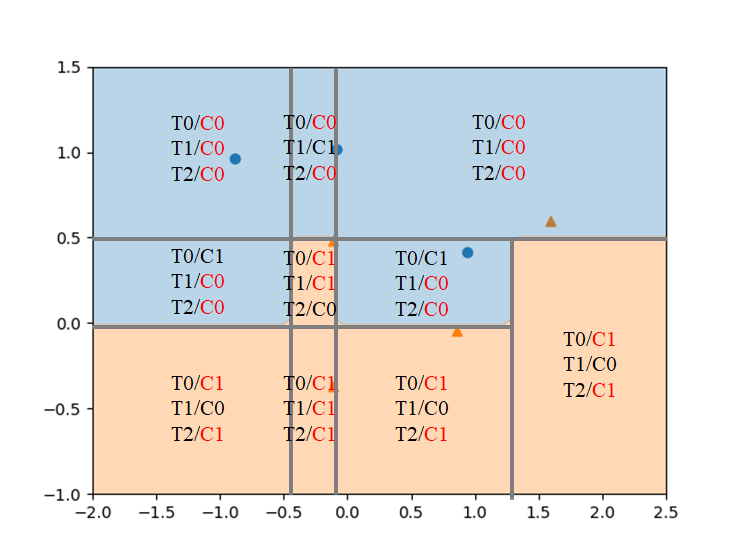
ある特徴量セットを持つデータのクラスを予測する。与えられたデータに対して、各決定木がクラスを判定し、その結果の多数決でそのデータのクラスを決定する。
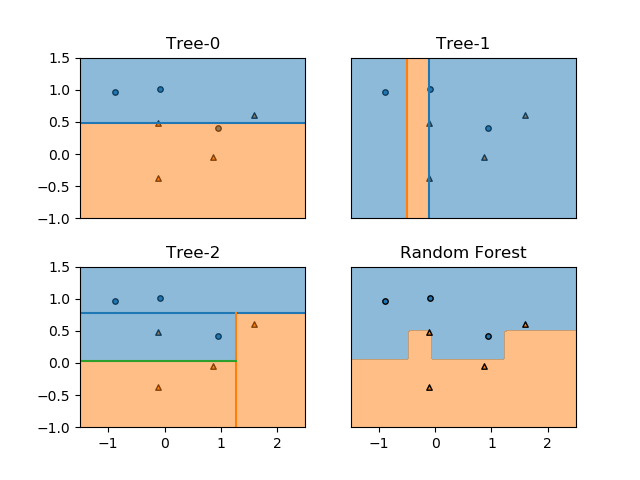
クラス分類でランダムフォレストが多数決で任意の点のクラスを決定する様子を確認する。以下は10個のmoonsデータセットに対して3つの分類木を適用した例。
訓練後のランダムフォレストにおいて、各点のクラスが多数決で決められていることが、以下の図で確認できる。
cancerデータによる確認
精度
breast_cancerデータに対してランダムフォレストを適用する。100個の決定木を準備し、他のパラメーターはデフォルトのままで実行する。
|
1 2 3 4 5 6 7 8 9 10 11 12 13 14 15 16 17 18 19 |
import numpy as np import matplotlib.pyplot as plt from sklearn.datasets import load_breast_cancer from sklearn.model_selection import train_test_split from sklearn.ensemble import RandomForestClassifier ds = load_breast_cancer() X_train, X_test, y_train, y_test = \ train_test_split(ds.data, ds.target, random_state=0) forest = RandomForestClassifier(n_estimators=100, random_state=0) forest.fit(X_train, y_train) print("Training score: {:.3f}".format(forest.score(X_train, y_train))) print("Test score : {:.3f}".format(forest.score(X_test, y_test))) fig, ax = plt.subplots() fig.subplots_adjust(left=0.3) ax.barh(ds.feature_names, forest.feature_importances_) plt.show() |
このコードの前半の実行結果は以下の通りで、訓練データに対して完全適合し、テストデータに対しても97.2%の精度を示している。
|
1 2 |
Training score: 1.000 Test score : 0.972 |
【注】決定木の数による違い
n_estimatorの数によって、テストスコアが違ってくるが、このケースでは100以上決定木の数を多くしてもテストスコアは向上しない。
- n_estimators = 10 → 0.951
- n_estimators = 50 → 0.965
- n_estimators ≥ 100 → 0.972
特徴量重要度
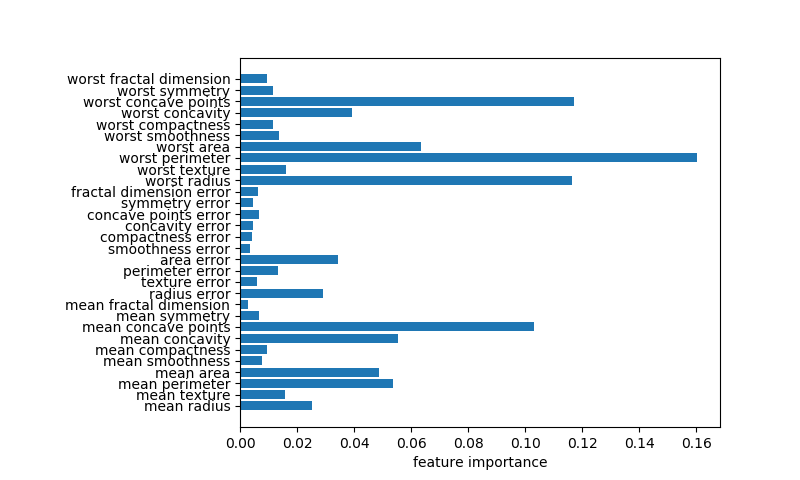
後半の実行結果は以下のように表示される。単独の決定木による特徴量重要度と比べて全ての特徴量が0以上の重要度となっている。決定木の時に最重要であったworst radiusも重要度が高いが、worst perimeterが最も重要度が高く、worst concave pointsやconcave pointsも重要度が高い。
今後の課題
- ランダムフォレストにおける特徴量重要度の意義
n_jobsの効果RandomForestClassifierのrandom_stateによる違いmax_features、max_depth、min_samples_leafなどの影響- デフォルトはmax_features=sqrt(n_features)、max_depth=None(all)、min_samples_leaf=1