種類・配置・形状
- display
- flex
- float/clear
- margin/padding
- border
表現
テキスト・フォント
リスト
たとえば、アンカー要素を親のブロック要素に張り付けたり、ブロック化したリストアイテムに張り付けるような場合を想定。
親要素全面への貼り付けは、ブロック要素かインラインブロック要素がよさそうなので、それらで縦センタリングを試してみる。
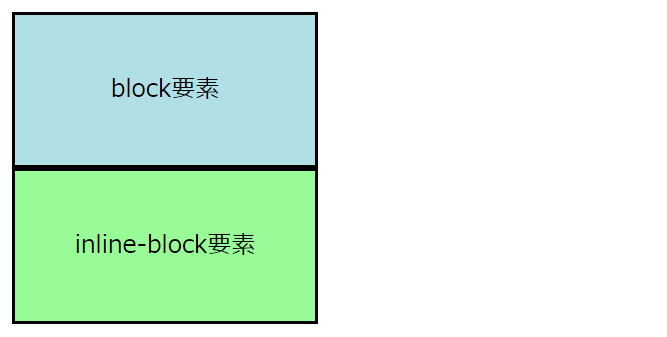
以下の試行では、ブロックの親要素に対してブロック、インラインブロックの子要素を前面に貼り付けて、そのテキストを横方向と縦方向にセンタリングしている。
考え方は以下の通り。
親要素でline-heightを設定する意味は以下の通り。
なお、子要素でline-height: 100%;としてもうまくいかない。これは、line-heightプロパティーが継承する値が親要素の行高さであって、親要素自体の高さではないためと思われる。
|
1 2 3 4 5 6 7 8 9 10 11 12 13 14 15 16 17 |
<!DOCTYPE html> <html lang="ja"> <head> <meta charset="utf-8"> <title>要素の拡張とセンタリングのテスト</title> <link rel="stylesheet" href="expand_centering.css"> </head> <body> <div class="parent_block"> <div class="child_block">block要素</div> </div> <div class="parent_block"> <span class="child_inline_block">inline-block要素</span> </div> </body> </html> |
|
1 2 3 4 5 6 7 8 9 10 11 12 13 14 15 16 17 18 19 20 21 22 23 24 25 26 27 |
.parent_block { display: block; border: solid 2px #000000; width: 200px; height: 100px; padding: 0px; line-height: 100px; } .child_block { display: block; background-color: #b0e0e6; margin: 0px; height: 100%; text-align: center; vertical-align: middle; } .child_inline_block { display: inline-block; background-color: #98fb98; margin: 0px; width: 100%; height: 100%; text-align: center; vertical-align: middle; } |
Chromeで表示させた結果、block、inline-blockとも縦横両方向でセンタリングされている。

これまでの方法では、親要素でline-heightを設定するために、親要素の高さと同じ値を2度CSSに書かなければならなかった。これはメンテナンス上煩雑で、ミスも生じやすい。
カスタムプロパティーを使うと、変数に値を代入して使うように、同じ値を再利用できる。
以下は、上で使ったのCSSのparent_blockの部分で、heightとline-heightに同じカスタムプロパティーを参照させている。
|
1 2 3 4 5 6 7 8 9 |
.parent_block { --parent-height: 100px; display: block; border: solid 2px #000000; width: 200px; height: var(--parent-height); padding: 0px; line-height: var(--parent-height); } |
CSSを書くとき、サイズ指定や色指定で同じ値を何度も打ち直すことがある。このように同じ値を常にコードとして打ち込むのは手間・ミスの素であり、メンテナンス上もよろしくない。
こういうとき、カスタムプロパティーを使うと、値を変数のように定義しておいて、何度も再利用できる。
--[カスタムプロパティー名]: [値];
再利用するための値で、数値、色コードなど、プロパティーの値で指定可能なもの。
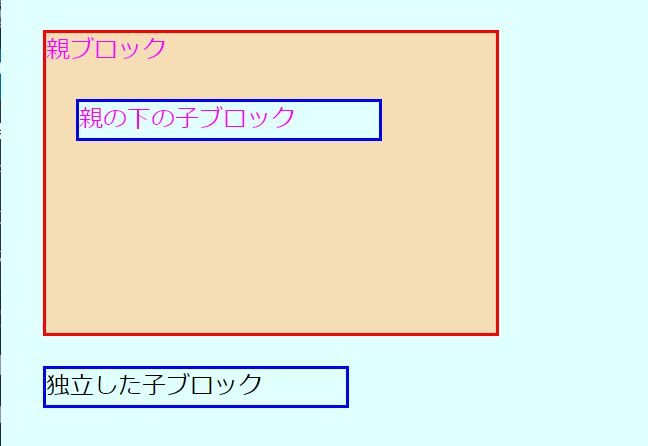
以下のことを確認している。
HTMLファイル
|
1 2 3 4 5 6 7 8 9 10 11 12 13 14 15 16 17 18 19 |
<!DOCTYPE html> <html lang="ja"> <head> <meta charset="utf-8"> <title>カスタムプロパティーのテスト</title> <link rel="stylesheet" href="css_custom_property.css"> </head> <body> <div class="parent"> 親ブロック <div class="child"> 親の下の子ブロック </div> </div> <div class="child"> 独立した子ブロック </div> </body> </html> |
CSSファイル
|
1 2 3 4 5 6 7 8 9 10 11 12 13 14 15 16 17 18 19 20 21 22 23 24 25 |
:root { --common-bg-color: #e0ffff; } body { background-color: var(--common-bg-color) } .parent { --face-color: #ff00ff; width: 300px; height: 200px; margin: 20px; background-color: #f5deb3; border: solid 2px #ff0000; color: var(--face-color) } .child { width: 200px; margin: 20px; color: var(--face-color); background-color: var(--common-bg-color); border: solid 2px #0000ff } |

たとえば以下のような場合を想定
結論としては、貼り付けたい要素をブロック要素かインラインブロック要素とするのがよさそう。
以下、親要素をブロック要素とする。
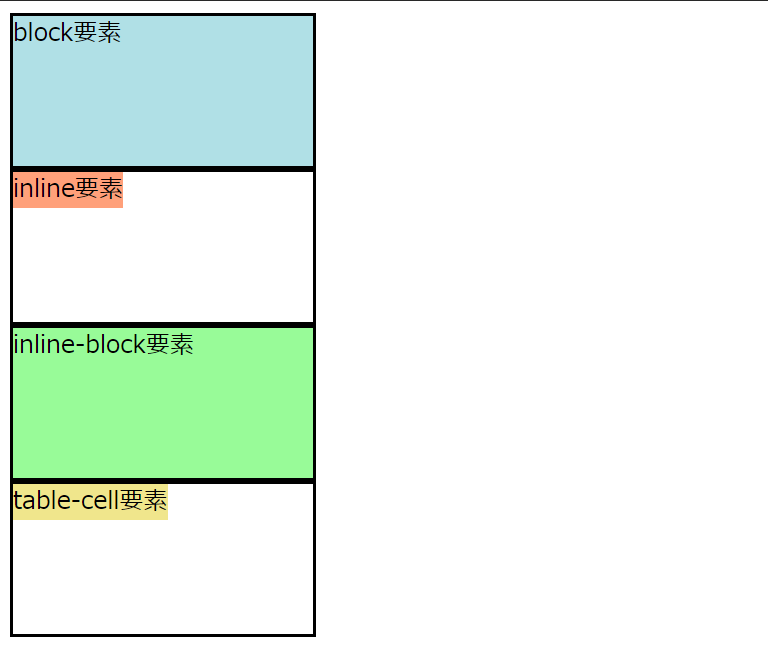
以下の試行結果は、ブロックの親要素に対して、子要素をブロック、インライン、インラインブロック、テーブル要素と様々なタイプにして、親要素全面への貼り付けを試してみたもの。
考え方は共通。
|
1 2 3 4 5 6 7 8 9 10 11 12 13 14 15 16 17 18 19 20 21 22 23 24 25 |
<!DOCTYPE html> <html lang="ja"> <head> <meta charset="utf-8"> <title>要素の拡張テスト</title> <link rel="stylesheet" href="expand.css"> </head> <body> <div class="parent_block"> <div class="child_block">block要素</div> </div> <div class="parent_block"> <span class="child_inline">inline要素</span> </div> <div class="parent_block"> <span class="child_inline_block">inline-block要素</span> </div> <div class="parent_block"> <span class="child_table_cell">table-cell要素</span> </div> </body> </html> |
|
1 2 3 4 5 6 7 8 9 10 11 12 13 14 15 16 17 18 19 20 21 22 23 24 25 26 27 28 29 30 31 32 33 34 35 36 37 |
.parent_block { display: block; border: solid 2px #000000; width: 200px; height: 100px; padding: 0px; } .child_block { display: block; background-color: #b0e0e6; margin: 0px; height: 100%; } .child_inline { display: inline; background-color: #ffa07a; margin: 0px; width: 100%; height: 100%; } .child_inline_block { display: inline-block; background-color: #98fb98; margin: 0px; width: 100%; height: 100% } .child_table_cell { display: table-cell; background-color: #f0e68c; width: 100%; height: 100%; } |
Chromeで表示させた結果。

ul、olの様々なマーカーを設定する。
list-style-type: [マーカースタイル];
| none |
|
| disc |
|
| circle |
|
| square |
|
| decimal |
|
| decimal-leading-zero |
|
| lower-roman |
|
| upper-roman; |
|
| lower-latin |
|
| upper-latin |
|
| lower-alpha |
|
| upper-alpha |
|
| lower-greek |
|
| cjk-ideographic |
|
| hiragana |
|
| katakana |
|
| hiragana-iroha |
|
| katakana-iroha |
|
|
1 2 3 4 5 6 7 8 9 10 11 12 13 14 15 16 17 18 19 20 21 22 23 24 25 26 27 28 29 30 31 32 33 34 35 36 37 38 39 40 41 42 43 44 45 46 47 48 49 50 51 52 53 54 55 56 57 58 59 60 61 62 63 64 65 66 67 68 69 70 71 72 73 74 75 76 77 78 79 80 81 82 83 84 85 86 87 88 89 90 91 92 93 94 95 96 97 98 99 100 101 102 103 104 105 106 107 108 109 110 111 112 113 114 115 116 117 118 119 120 121 122 123 124 125 126 |
<h1>ul</h1> <p>list-style-type: none;</p> <ul style="list-style-type: none"> <li>ガンダム</li> <li>ガンキャノン</li> <li>ガンタンク</li> </ul> <p>list-style-type: disc;</p> <ul style="list-style-type: disc"> <li>ガンダム</li> <li>ガンキャノン</li> <li>ガンタンク</li> </ul> <p>list-style-type: circle;</p> <ul style="list-style-type: circle"> <li>ガンダム</li> <li>ガンキャノン</li> <li>ガンタンク</li> </ul> <p>list-style-type: square;</p> <ul style="list-style-type: square"> <li>ガンダム</li> <li>ガンキャノン</li> <li>ガンタンク</li> </ul> <p>list-style-type: decimal;</p> <ol style="list-style-type: decimal"> <li>ガンダム</li> <li>ガンキャノン</li> <li>ガンタンク</li> </ol> <p>list-style-type: decimal-leading-zero;</p> <ol style="list-style-type: decimal-leading-zero"> <li>ガンダム</li> <li>ガンキャノン</li> <li>ガンタンク</li> </ol> <p>list-style-type: lower-roman;</p> <ol style="list-style-type: lower-roman"> <li>ガンダム</li> <li>ガンキャノン</li> <li>ガンタンク</li> </ol> <p>list-style-type: upper-roman;</p> <ol style="list-style-type: upper-roman"> <li>ガンダム</li> <li>ガンキャノン</li> <li>ガンタンク</li> </ol> <p>list-style-type: lower-latin;</p> <ol style="list-style-type: lower-latin"> <li>ガンダム</li> <li>ガンキャノン</li> <li>ガンタンク</li> </ol> <p>list-style-type: upper-latin;</p> <ol style="list-style-type: upper-latin"> <li>ガンダム</li> <li>ガンキャノン</li> <li>ガンタンク</li> </ol> <p>list-style-type: lower-alpha;</p> <ol style="list-style-type: lower-alpha"> <li>ガンダム</li> <li>ガンキャノン</li> <li>ガンタンク</li> </ol> <p>list-style-type: upper-alpha;</p> <ol style="list-style-type: upper-alpha"> <li>ガンダム</li> <li>ガンキャノン</li> <li>ガンタンク</li> </ol> <p>list-style-type: lower-greek;</p> <ol style="list-style-type: lower-greek"> <li>ガンダム</li> <li>ガンキャノン</li> <li>ガンタンク</li> </ol> <p>list-style-type: cjk-ideographic;</p> <ol style="list-style-type: cjk-ideographic"> <li>ガンダム</li> <li>ガンキャノン</li> <li>ガンタンク</li> </ol> <p>list-style-type: hiragana;</p> <ol style="list-style-type: hiragana"> <li>ガンダム</li> <li>ガンキャノン</li> <li>ガンタンク</li> </ol> <p>list-style-type: katakana;</p> <ol style="list-style-type: katakana"> <li>ガンダム</li> <li>ガンキャノン</li> <li>ガンタンク</li> </ol> <p>list-style-type: hiragana-iroha;</p> <ol style="list-style-type: hiragana-iroha"> <li>ガンダム</li> <li>ガンキャノン</li> <li>ガンタンク</li> </ol> <p>list-style-type: katakana-iroha;</p> <ol style="list-style-type: katakana-iroha"> <li>ガンダム</li> <li>ガンキャノン</li> <li>ガンタンク</li> </ol> |
list-style-type: none;
list-style-type: disc;
list-style-type: circle;
list-style-type: square;
list-style-type: decimal;
list-style-type: decimal-leading-zero;
list-style-type: lower-roman;
list-style-type: upper-roman;
list-style-type: lower-latin;
list-style-type: upper-latin;
list-style-type: lower-alpha;
list-style-type: upper-alpha;
list-style-type: lower-greek;
list-style-type: cjk-ideographic;
list-style-type: hiragana;
list-style-type: katakana;
list-style-type: hiragana-iroha;
list-style-type: katakana-iroha;
marginでボックス要素の外側の余白、paddingでボックス要素の内側の余白を設定する。
以下の例は、p要素にmargin=40pxとpadding=20pxを設定していて、親のbody要素からp要素の外側まで40px、p要素の外側からその内容まで20pxの余白がとられている。
|
1 2 3 4 5 6 |
<p style="border: solid; margin: 40px; padding: 20px;"> ゴーシュは町の活動写真館でセロを弾く係りでした。 けれどもあんまり上手でないという評判でした。 上手でないどころではなく実は仲間の楽手のなかではいちばん下手でしたから、 いつでも楽長にいじめられるのでした。 </p> |
ゴーシュは町の活動写真館でセロを弾く係りでした。けれどもあんまり上手でないという評判でした。上手でないどころではなく実は仲間の楽手のなかではいちばん下手でしたから、いつでも楽長にいじめられるのでした。
margin、paddingはボックス要素の外と内に対する余白で、上下左右の余白量に対する指定の仕方は双方に共通する。
margin/paddingに以下を続けて、それぞれの余白を個別に設定。
たとえばpadding-left: 20px;は左内側の余白を20pxで指定。
HTMLで同じタグやクラスの先頭や末尾に共通の文字列を表示させる方法。
たとえばh1要素の先頭に必ず”●”をつけたいときなど。
[セレクター]:before {content: [文字列];}
[セレクター]:after {content: [文字列];}
以下はh1要素の前後に共通の文字列を付加するように指定したCSSを、HTMLのヘッダー部分に書いた例。
これのページを表示させると、h1要素は全てセンタリングされ、先頭に"<<"、末尾に">>"の文字列が付加され、すべてのタグに繰り返し文字を打つ必要がない。
スタイルで記述する場合、<などのエンティティ-で書く必要はない。
|
1 2 3 4 5 6 7 8 9 10 11 12 13 14 15 |
<!DOCTYPE html> <html lang="ja"> <head> <meta charset="utf-8"> <title>Template by content</title> <style type="text/css"> h1:before {content: "<<";} h1:after {content: ">>";} h1 {text-align: center;} </style> </head> <body> <h1>テスト</h1> </body> </html> |